Neverness to Everness 에스퍼 제로 빌드 가이드
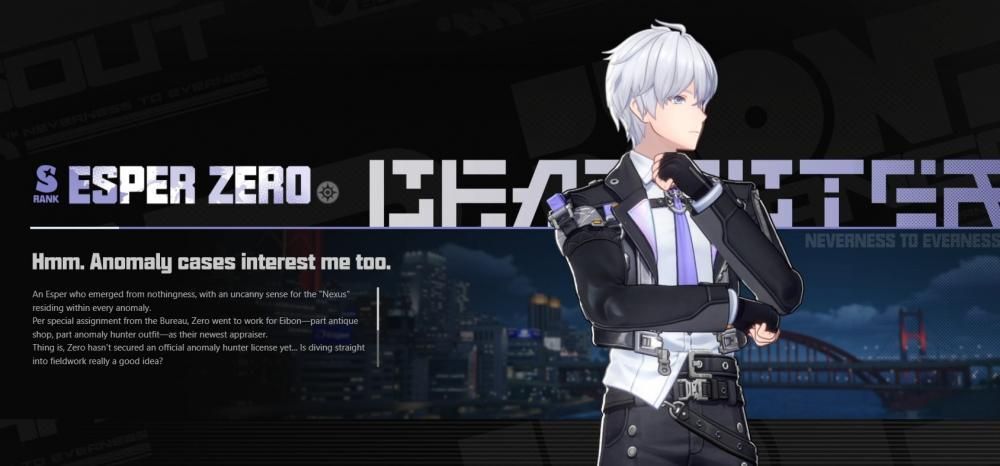
에스퍼 제로는 완전히 커스터마이징 가능한 주인공 of Neverness to Everness — an S-rank, sword-wielding Cosmos-element DPS who serves as the perfect entry point for new players while scaling beautifully into endgame content. As the anomaly investigator you control from the very start, Zero delivers smooth on-field pressure, strong AoE clears, and reliable boss damage through a straightforward kit built around chaining basic attacks into skills and ultimates. A well-built Zero keeps your team flowing with Cosmos reactions and never feels underwhelming — and that’s exactly why you need this best Esper Zero build guide.
목차
에스퍼 제로는 누구이며 왜 가장 먼저 육성해야 할까?
에스퍼 제로는 남성과 여성 버전 간에 자유롭게 성별을 변경할 수 있는 주인공으로 돋보이며, making him (or her) instantly relatable. His Cosmos element shines in reaction-heavy teams, and his sword-based playstyle rewards consistent field time rather than complicated character swaps.
제로는 전반적인 사용성 면에서 확고히 A 티어에 랭크됩니다: he offers excellent mob clearing, decent single-target scaling, and an extremely low skill floor. Most Neverness to Everness beginners love him because he can carry early story content solo. At the same time, veterans pair him with supports to trigger Blossom and Remora chains that melt stagger bars without breaking a sweat. Investing in Zero pays off long-term since he is free to obtain and exceptionally easy to raise.
에스퍼 제로 스킬 및 플레이스타일 설명
에스퍼 제로 빌드를 최대한 활용하려면 먼저 그의 키트가 어떻게 작동하는지 명확히 이해해야 합니다. Zero revolves around steady basic attack chains that build Esper Cycle value, a skill that sets up reactions, and an ultimate that cashes out massive damage.
정확한 스킬 내역은 다음과 같습니다:
- 기본 공격 – 감정 (단절): Up to five consecutive energy-charged sword strikes. This is your bread and butter for maintaining field presence and charging the Esper Cycle meter naturally.
- 스킬 – 감정 및 각인: Three quick weapon strikes transition into an aerial leap and charge, then fire an Esper Cannon that deals one instance of AoE Cosmos damage. It also deals an extra Cosmos hit to the first enemy whose level is below Zero’s — making it ideal for overworld mobs and lower-level bosses.
- 궁극기 – Divide by Zero: A sweeping blade dance that severs invisible Nexus lines, dishing out multiple instances of Cosmos damage across a wide area. This is your big payoff move during stagger windows.
- 서포트 스킬 / QTE – Rift Blossom: When swapped in, Zero slashes space open and detonates a rift for two instances of AoE Cosmos damage — great for quick off-field contribution.
- 패시브 – Appraiser: Restores HP (50% of base ATK) whenever the active character gains ultimate energy.
- 패시브 – Anomaly Perception: Permanently increases Divide by Zero’s damage by 25%.

핵심 플레이스타일 및 로테이션:
Stay on-field with normal attacks to build meter, then use Appraise and Engrave to accelerate the cycle and trigger reactions — especially Blossom with Anima teammates. Swap out for your supports to cash in Remora marks or charge energy, then return and unleash Divide by Zero during stagger windows for maximum burst. The rotation feels completely natural: Normal chain → Skill → Support swaps → Ultimate → repeat. It rewards clean timing rather than flawless execution, making Zero forgiving even in chaotic urban fights.
재능 (스킬) 업그레이드 우선순위
핵심 로테이션이 빠르게 작동하도록 자원을 효율적으로 집중하세요:
- 스킬 (감정 및 각인) 우선 – Improves cycle speed and sets up reactions immediately.
- 궁극기 (Divide by Zero) 차선 – Boosts your primary damage spike.
- 기본 공격은 마지막 – 핵심 루프가 확고해진 후에만 진행하세요. 일반 공격은 필드 시간에 따라 자연스럽게 스케일링됩니다.
Esper Zero 에게 최고의 무기
완벽한 Esper Zero 빌드 또한 올바른 무기 장착에 달려 있습니다. Zero 의 시그니처 옵션은 순수 ATK 와 보스 유지 시간을 강조합니다:
- Hethereau’s Keeper (Signature): 최고의 선택지입니다. 상당한 ATK 증가와 직접적인 보스 피해 증폭을 제공합니다 — Zero 의 다단 히트 궁극기와 단일 대상 교전에서의 긴 필드 시간에 완벽합니다.
- Day Off (F2P 친화적 대안): 키트의 모든 부분에 혜택을 주는 막대한 ATK 부스트를 제공합니다. 처치 기반 필드 에센스 환불은 Zero 의 뛰어난 AoE 커버리지 덕분에 오버월드 파밍과 다중 웨이브 이벤트에서 진가를 발휘합니다.
한정 배너를 놓치지 않고 Hethereau’s Keeper 와 같은 프리미엄 무기를 빠르게 획득 및 정제하려면 Enjoygm 을 통해 안전하게 충전할 수 있습니다. 계정을 안전하게 보호하면서 같은 날 보스 런에서 무기의 전체 잠재력을 테스트할 수 있습니다.
아티팩트 시스템 및 스탯 우선순위
NTE 는 독특한 테트리스 조각 아티팩트 보드를 사용하며, 각 Type III 조각은 장착 시 +10% ATK 를 제공합니다. 모양이 허용하는 한 보드를 가능한 많은 Type III 조각으로 채우는 것을 우선시하세요.
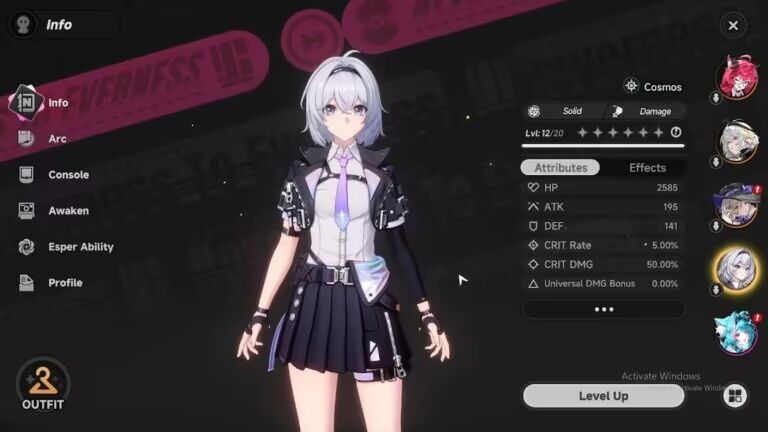
주요 스탯 우선순위 (순서대로):
- ATK% (또는 적절한 슬롯의 Cosmos DMG 보너스)
- 치명률
- 치명 피해
서브 스탯 우선순위: ATK%, 치명률/피해, 그다음 에센시아 (무거운 블로섬 팀을 운용한다면 반응 유지 시간을 위해). 순수 F2P 이고 추가 생존력이 필요한 경우가 아니라면 DEF 나 HP 는 피하세요.
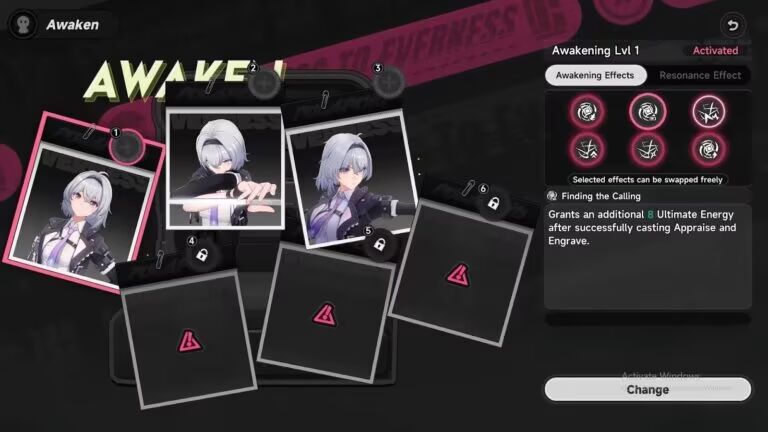
Awaken (Constellation) 선택 및 우선순위
Awaken 은 Zero 의 중복 시스템입니다. 가장 영향력 있는 파워 스파이크를 위해 이 순서로 획득하세요:
- Finding the Calling – Appraise 와 Engrave 사용 후 궁극기 에너지 +8 로 훨씬 원활한 로테이션 가능.
- Anomalies Record – Divide by Zero 에 치명률 +50% (궁극기 피해를 더 높이기 위해 사본을 3 개 이상 보유했다면 대신 Undecided Factors 를 우선시하는 것을 고려하세요).
- Undecided Factors (사본 3 개) – 최대 +25% Divide by Zero 피해.
- Theopneustos – 지원 스킬이 발동될 때 20 초 동안 팀 ATK +10% 제공.
- Deceptive Liberation – Appraise 와 Engrave 의 추가 피해 비율을 크게 증가시킵니다.
최우선순위 낮음: Blooming Gaze (조건부 추가 타격 및 DEF 무시 — 더 상황에 따라 달라지며 주로 몹 대상).
Esper Zero 를 위한 최고의 팀 구성
가장 강력한 Esper Zero 팀은 모두 그를 필드 Cosmos 드라이버로 사용하는 것을 중심으로 돌아갑니다. 여기 추천 라인업이 있습니다:
| 팀 | 역할 | 작동 이유 |
|---|---|---|
| Zero + Nanally + Hathor + Fadia | 메인 DPS / 블로섬 서포트 / 레모라 버퍼 / 힐러 | Nanally 는 블로섬 압력을 위해 추가 Lebenstamm 을 추가합니다; Hathor 는 스킬 후 상태와 이동을 업그레이드합니다; Fadia 는 안전한 필드 시간을 위해 힐링과 팀 HP 패딩을 제공합니다. 대부분의 콘텐츠에 이상적입니다. |
| Zero + Mint + Skia + Fadia | 메인 DPS / 블로섬 인핸서 / 컨트롤 서포트 / 힐러 | Mint 는 더 원활한 AoE 를 위해 블로섬 폭발을 분할합니다; Skia 는 군중 제어와 레모라 가치를 제공합니다; Fadia 는 모두를 살아있게 합니다. 조종이 더 쉽고 탐사에 환상적입니다. |
블로섬 스폰을 위해 Cosmos-Anima 중심으로 구성하거나, 더 오래 필드에 머무를 수 있게 하는 레모라 감속을 위해 Lakshana-Cosmos 중심으로 구성하세요. 네 번째 슬롯은 항상 힐링이나 추가 반응 유지 시간을 커버해야 합니다.
Esper Zero 를 위한 승천, 레벨링 및 재료
가능한 한 빨리 Zero 를 레벨 80+ 로 올리세요 — 그의 스케일링은 초기 집중형이며 즉시 차이를 느낄 수 있을 것입니다.
우선순위 체크리스트:
- 캐릭터 레벨과 무기를 월드 랭크에 맞게 유지하세요.
- 표준 코스모스 승급 재료를 사용하세요 (헤스로 어노멀리에서 파밍 가능).
- 본드 선물을 주어 라이프 스킬을 잠금 해제하여 추가 친밀도를 획득하세요 (미래 스토리 보상에 도움이 됨).
일일 루틴: 재료 획득을 위해 일일 어노멀리를 클리어하고, 레벨 우위 캐논 보너스를 위해 탐험 시 제로를 적극적으로 활용하며, 권장 팀 레벨에 도달하면 보스를 사냥하세요.
제로 마스터를 위한 프로 팁
- 하위 월드 몹에게 감정 (Appraise) 과 각인 (Engrave) 의 레벨 체크 추가 피해를 활용하여 손쉽게 클리어하세요.
- 패리를 사용하여 에스퍼 사이클 게이지를 즉시 채우고 즉각적인 반응 창을 강제하세요.
- 스턴 창 동안 제로의 시간 분할 (Time Divide) 을 사용하여 스태거 바를 대량으로 감소시키세요.
- 오픈 월드에서는 제로를 필드에 유지하세요 — 대부분의 서포터보다 빠르게 무리들을 처치합니다.
- 코스모스 반응에 주의하세요: 블로섬 (Blossom) 은 무료 자동 피해를 제공하고, 레모라 (Remora) 는 타겟을 둔화시켜 더 안전하고 긴 콤보를 가능하게 합니다.
결론
이상으로 네버니스 투 에버니스의 최고의 에스퍼 제로 빌드 가이드를 마칩니다. 이 빌드를 따르면 제로가 출시일부터 엔드게임 어노멀리까지 좌절감 없이 여러분을 이끌 것입니다. 그가 주인공인 데는 이유가 있습니다 — 똑똑하게 투자하고 깔끔하게 반응하면 헤스로의 도시가 여러분의 놀이터가 될 것입니다.